Apple's macOS offers a handy Screenshot tool for capturing a specific part of the screen. This is useful for creating online content for lectures, conferences, webinars, tutorials, etc. This is where the Screenshot tool comes in handy for screen recording. Here's how you can use Screenshot's native screen recording capability or enlist the help of a third party app to record screen on your Mac.
The Screen Record tool packs basic functionality and offers a number of customization options and features for recording. Read how to record screen on Mac.
1. Use the screenshot tool
Apple's native Screenshot tool offers three ways to use it on Mac. To get started, you can use one of the tricks below to summon the tool.
- Press Command + Shift + 5 to open the screenshot as well.
- Open Launchpad and you will find the screenshot in the More menu. By default, macOS keeps the screenshot there. You can pin it to the macOS dock for easy access.
- Press Command + Space and open Spotlight Search. Type screenshot and press Enter to open the tool.
Now that you have it open, let's understand how to record screen on Mac.
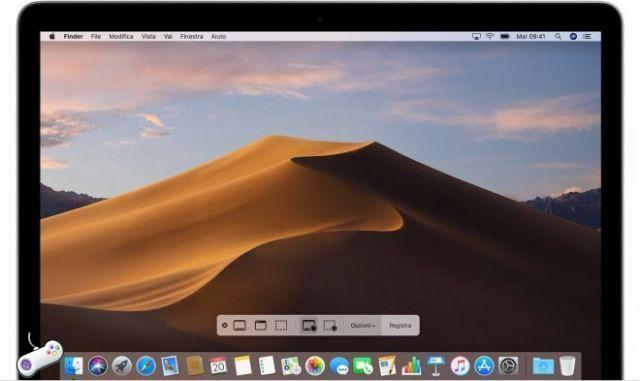
Step 1: macOS will open a capture area and a control bar at the bottom with functions to play with.
Step 2: the first two functions on the left side are related to the screenshot. The third option allows you to capture the selected area. Move your attention to the fourth and fifth tab which bear a small registration icon.
Step 3: you can click the Record icon and start recording the content on the screen.
Before hitting the record button, you should consider using the Options menu to make relevant changes for a flawless screen recording experience.
The Options menu allows you to select the video export location, set the timer, select the default microphone and show / hide mouse clicks.
Selecting the default microphone is an important step for anyone working with an external microphone. If you don't select the right microphone, the final video won't have the audio you want.
To stop recording, simply click on the record option in the menu bar. macOS will offer a thumbnail of the video in the lower right corner.
You can click on it and trim the video using the crop option and even delete the video directly.
While the default screenshot tool does the job, you should invest in a third-party screen recording tool like CleanShot X or Snagit. They offer more features and customization options for one price.
2. Usa CleanShot X
CleanShot X is a native macOS app for taking screenshots, recording videos, creating gifs, and more.
Using CleanShot X, you can also annotate videos, share your thoughts while recording with a small thumbnail in the corner, and edit videos before export. The app requires $ 29 as a one-time payment.
Follow the steps below to use CleanShot X on Mac.
Step 1: visit CleanShot X official website, purchase and download the software.
Download CleanShot X
Step 2: download the app and add the license key.
Step 3: during startup, CleanShot X will ask you to remap the native screenshot shortcuts to the app to take the screenshot and start the screen recording.
Make the necessary changes to the key combination and you're ready to record your screen on your Mac.
The app remains in the macOS menu bar. Click the app icon and select Record Screen.
You can change the display resolution to keep the video file size small, select a microphone, create a gif, show mouse clicks, adjust the presenter thumbnail, and set the timer to start recording.
After recording the video, users can play with the audio settings to make relevant changes to the voice output. CleanShot X allows you to change the volume of your Mac's microphone and speaker for the desired output.
If your workflow requires taking multiple screenshots and screen recordings, CleanShot X is definitely worth every penny. The only problem is that it's only available on macOS.
Those looking for a cross-platform screen recording solution should check out SnagIt.
Download Snagit
Record screen on mac
macOS continues to offer better value with native tools like Screenshot. Using the Screenshot tool, you can easily record the screen on the Mac. Power users may be left wanting more. They should check out third-party apps like CleanShot X and Snagit.
How to clear cache, history and cookies in Safari on Mac


![Serial Windows 10 [Product Key]](/images/posts/81d208d8c702822ef472df6012c6c29d-0.jpg)