You have started playing your favorite title assiduously and, over time, you have achieved truly remarkable results of which you are particularly proud: for this reason, you would like to register a clip containing the most beautiful gameplays to show to your friends (or your followers) at the right moment.
In this regard, you will be pleased to know that the most modern computer operating systems have integrated functions, specifically for recording everything that happens on the desktop, games included; moreover, there are programs designed for this very purpose, often free.
The theme of this guide of mine will be to explain to you, precisely, how to clip on pc using easy-to-use utilities and software. So, without waiting any longer, take some free time and carefully read everything I have to explain on the subject: I'm sure that, after reading this guide, you will be perfectly able to choose the solution that best suits your needs . Having said that, there's nothing left for me to do but wish you a good read and have fun!
Index
Clipping programs for PC
There are really many programs used to record clips containing game matches, programs and, in general, desktop events, mostly free and often integrated into the operating system. In the following sections of this chapter, I am going to show you how the ones that, in my opinion, represent the best in their category, work.
Xbox Game Bar (Windows 10)
If you use a computer equipped with Windows 10, you can record short clips and full video sequences of what's happening on screen using the Xbox game barthe Xbox game bar, that is a component included "standard" in the Microsoft operating system, designed specifically for gamers (but which can also be used to record everything that happens on the desktop).
The tool in question, however, can only be used on computers that have one of the following video cards: NVIDIA GeForce 600, NVIDIA 800M and later, or AMD Radeon serie HD 7700, 7700M, 8500M, Radeon R7, Radeon R9 and later. If you don't know the GPU currently installed on your computer and you don't know how to see which video card you have, you can follow the instructions I have given you in my guide dedicated to the subject.
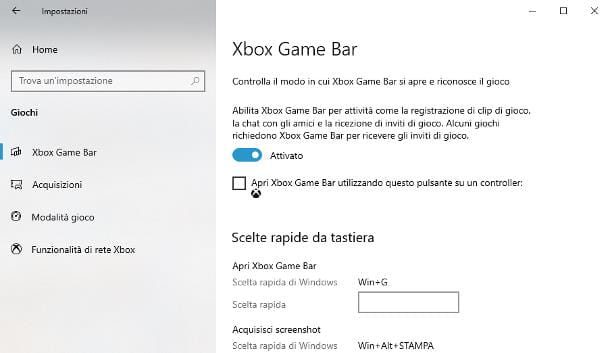
However, if your card is compatible with the Xbox Game Bar, check that the related feature is active: right click on the button Home of Windows (the icon in the shape of pennant located in the lower left corner of the screen), select the item Settings from the menu that appears and, having reached the new window, click on the icon dedicated to Toys.
Then click on the item Xbox game bar located in the left sidebar and check that the toggle located at the top of the screen is set to On; otherwise you can do it yourself.
From now on, you're finally ready to use the Xbox Game Bar: launch the game (or the program) you intend to record and, to start capturing the clip, press the key combination Win + Alt + R on the keyboard. When recording is complete, press the same key combination to save the movie, which will automatically be archived in the folder VideoCaptures of Windows.
To turn audio recording on or off, press the keys instead Win+Alt+M; to start capturing a clip of a fixed length, equal to 15 seconds, press the buttons instead Win + Alt + G.
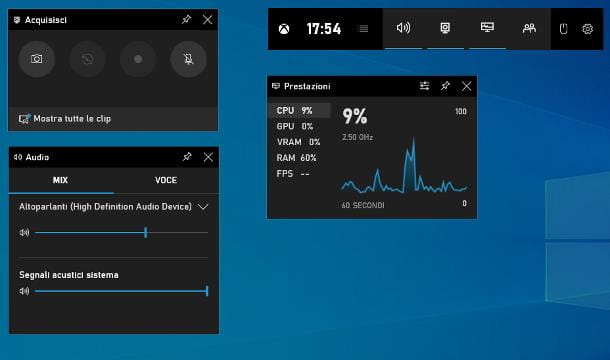
If necessary, you can also control the Xbox game bar via its graphical interface: press the key combination Win + G on the keyboard, to bring up its main interface. Next, make sure the tabs Acquire e Audio are active, otherwise press the icons ofspeaker and camera, placed on the Xbox Game Bar main bar, to make them visible.
Now, use the tools on the box Audio, to choose the sound acquisition device and adjust its volume; to activate/deactivate the acquisition of sounds, click on the symbol of microphoneresiding on the card Acquire. To start recording the clip, press the ● button, visible in this last tab; to interrupt it and save the video, click on the ■ button.
Note: accessing the area Settings > Games > Xbox Game Bar of Windows 10, you can also customize keyboard shortcuts for recording, mute/unmute, etc.
OBS (Windows/macOS/Linux)
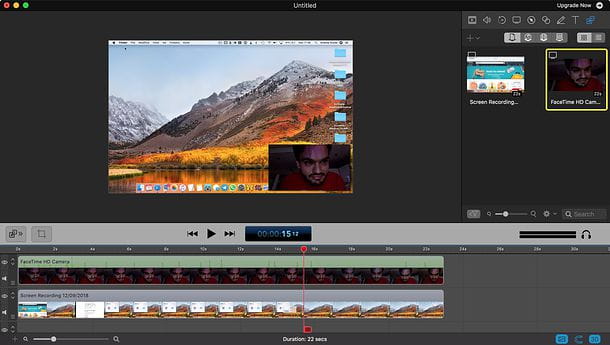
Another excellent program that allows you to clippare su PC is definitely Viewer discretion (Acronym for Open Broadcaster Software): if you had never heard of it, it is a completely free software, compatible with both Windows that with MacOS e Linux, capable of capturing the entire screen, parts of it or well-defined windows, with the possibility of adding your own webcam overlay and streaming directly to dedicated platforms, for example YouTube e Twitch.
To get it, connect to its home page, press the button that best suits yours operating system and wait for the software installation package to download to your computer.
When the download is complete, open the fillet obtained and, if you use Windows, click on the buttons in sequence Yes, NEXT (twice in a row), install e Finish, to complete the setup.
If you employ a Macinstead, click the button Continue twice consecutively, then on the button Install and, when prompted, enter the Password of the Mac in the appropriate text field. Then finalize the procedure by pressing the buttons Install Software, Close e Move (more info here).
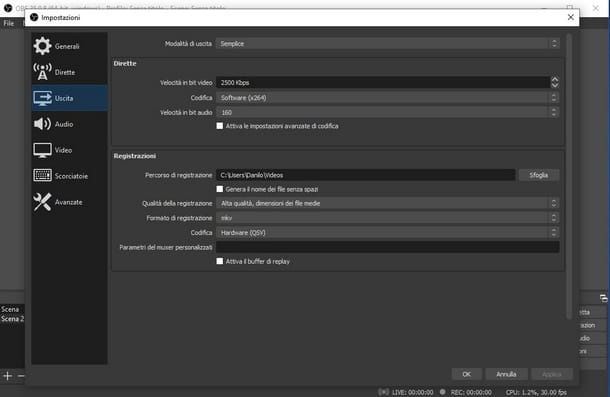
Once installation is complete, open the program and click on the button Cancel, to skip the first configuration procedure; subsequently, once the OBS main screen is displayed, press the button Settings located at the bottom right and select the item Dismissal located in the new window that appears, so you can customize the settings related to the recorded videos.
First, set up the dropdown menu Exit mode su Simple, award-winning Shop by Department placed next to the item Registration path and indicates the folder in which to save the clips acquired through the program.
Subsequently, intervene on the drop-down menus Recording quality, Recording format e Coding, setting the parameters that best suit your needs; if you don't know what to choose, I recommend setting the three options, respectively, to High quality, Average file sizes, mp4 e Software (x264): these settings are just fine, in general.
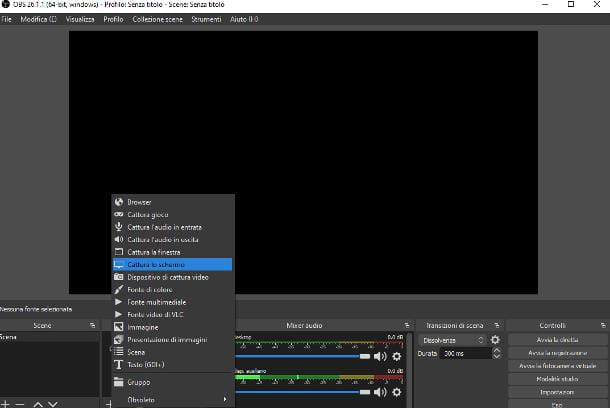
After completing the necessary adjustments, click on the button OK, to return to the program, and start configuring the scene, i.e. the "canvas" on which to record the clip.
First, click on the button capacitor positive (+) lead placed in the box Sources and select the item Capture the screen, to clip the whole desktop; or Window capture, to capture only the window of an already running program. Once this is done, follow the same steps to add a source of type Outgoing sound, to record the sounds your computer plays, and optionally add theIncoming sound, to capture those coming from the microphone.
Now, if you deem it appropriate, you can add further video sources to the scene: for example, if you are also interested in recording everything that the webcam "sees", add a new source of the type Video capture deviceclick on your button OK and, after choosing the webcams to use and capture quality, resize and/or drag the related frame to the part of the scene you prefer.
Once the scene has been set, you can immediately start recording the clip by pressing the button Start recording and then opening the program/game to acquire; to end it and archive the movie in the folder previously chosen, return to the OBS window and click on the button Stop recording.
If you wish, you can also set up keyboard shortcuts, so that you can start/stop recording in OBS, "jump" from one scene to another and perform other operations without touching the mouse: to do this, open the Settings of the program and click on the item Shortcutsvisible from the side.
To find out more about the recording, management and direct streaming functions of OBS, I refer you to reading the in-depth tutorial that I have entirely dedicated to this excellent software.
Screenshot (macOS)

If you own a Mac, you can also record short (or long) clips using Screenshot, the program present by default on macOS versions equal to or later than 10.14 Mojave, which allows you to record the entire Mac desktop, a portion of it or a specific window, in just a few clicks.
So, launch the game/program you want to record and press the key combination cmd + shift + 5, to bring up the Screenshot toolbar, which should appear as a superimposition at the bottom of the display. Alternatively, you can achieve the same result using the menu Vai > Utility of macOS (present in the menu bar) or by opening the folder Other of Launchpad and I learn Screen Snapshot.
Now, if you want to capture the entire screen content, click on the icon marked with rectangle with circle (Record the entire screen); to acquire only a part of what you see, click instead on the icon representing a dashed rectangle with circle (Record your selection) and define the area to record, using the cursor that appears immediately after.
If you are interested in adding the sounds coming from the microphone to the clip, click on the button options visible on the Screenshot bar, then on the entry Microphone and, later, on microphone name to use.
Once all the necessary adjustments have been completed, press the button Register, to start capturing the clip. When you're done, press the key combination instead cmd+ctrl+esc (or the ■ button visible in the Mac menu bar), to stop recording the movie, which will be automatically saved in .MOV format.
Other programs for clipping on PC
In addition to the solutions I've told you about so far, there are several other software that allow you to capture short (but also long) clips containing everything that happens on your computer screen. Below I list a few.
- Camtasia Studio (Windows): This is software designed to capture screen clips and embellish them with additional effects (real-time narration, filters, music, and much more). It costs €244,53, but can be tried for free for 30 days. More info here.
- Screenflow (macOS): This is a complete solution for Mac, which allows you to capture screen clips, edit and stitch together the movies you make. The free version of the program watermarks the recordings; to eliminate it, you need to purchase a regular user license, which costs $129.
How to clip on PC: Fortnite
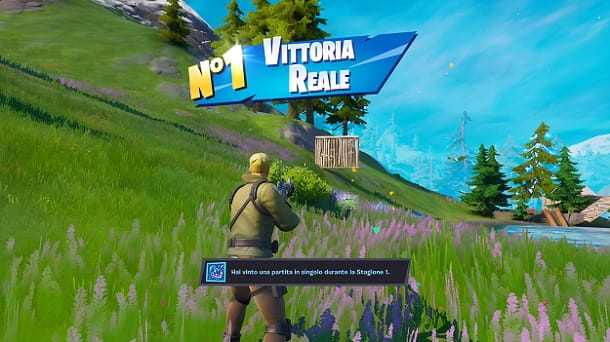
clip to PC game sessions started on Fortnite, you can easily use the Xbox Game Bar, OBS, Screenshot or the other programs to record gameplay that I mentioned above: in this case, all you have to do is configure the chosen software, then start Fortnite and press the key combination (or the on-screen button) to start capturing the clip.
As an alternative, you can take advantage of the Fortnite auto-save game option, which not only records all the games you play, but also those of other Battle Royale players who are not in an area too far from the character: find out more, I refer you to reading my tutorial on how to watch replays in Fortnite, in which I studied how to use the aforementioned feature.


![Bioshock Infinite - How to unlock the Achievement / Heartbreaker Trophy [360-PS3]](/images/posts/744a69d112f7d05f57994fd94b5fdf52-0.jpg)
![One Piece Pirate Warriors 2: Video Complete Solution [360-PS3]](/images/posts/ac0308a5af00800a8b719053780bfd3f-0.jpg)
![Skyrim - How to become a vampire [guide to vampirism]](/images/posts/a4bb58be06bee6da1634eb858ec0ff7f-0.jpg)

![Soul Calibur 5 - How to Unlock Extra Hit Effects [360-PS3]](/images/posts/62a29d175b0af5767e12340c7e8224bc-0.jpg)


![Uncharted 4: Prison Puzzle Solution [Chap. 2, puzzle]](/images/posts/f28e4a6f699e3b5703b776730db2b56a-0.jpg)

![Assassin's Creed 3 - How to find the logins and synchronize the Animus [in the network]](/images/posts/2aed455a1476e4cbf4e6d2f7e21e475a-0.jpg)