You recently embarked on a new adventure, deciding to abandon the Android smartphones you've always used in favor of a iPhone 13. However, having never dealt so "closely" with iOS and its apps, now that you have your new Apple smartphone in your hands, everything seems different and in some ways complicated compared to what you were used to. .
Even the simple capture of the screen seems complex to accomplish, so you've started looking for a solution and would like to know if I can help you understand how to screenshot iPhone 13? Is that so? Then don't worry: that's exactly why I'm here!
I want to tell you already that it is an extremely simple operation, which is essentially performed using the side keys on the "iPhone by". However, there are other ways to take a screenshot as well and you will find them all described in the next few lines. They are valid for any version of the iOS operating system, so don't worry about this aspect and continue reading. Happy reading and have fun!
Index
How to screenshot iPhone 13
As I announced at the beginning of this tutorial, there are several methods for take screenshots on iPhone 13: you can use the side keys, you can take long screenshots of entire web pages/PDFs or you can decide to opt for taking screen captures without using the keys. Whichever method you prefer or the type of screenshot you need, it's all described below.
How to take a screenshot iPhone 13
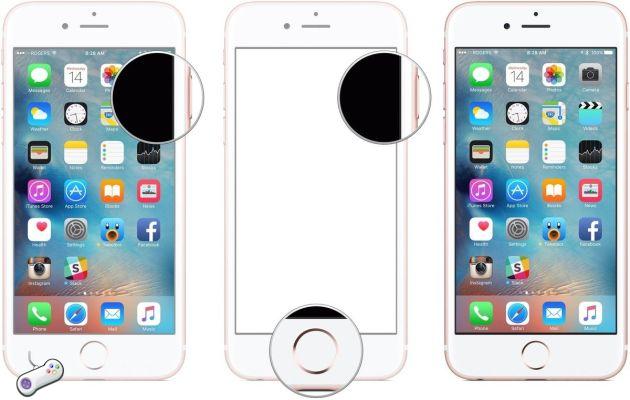
By far the most convenient way to take a screenshot is to use the side keys present on your iPhone. The capture mode, in this way, is extremely simple and intuitive: all you have to do is go to what you want to capture and simultaneously press the key Volume up, located on the left of the phone, and the right side button.
By doing so, the shot will be taken which you will be able to see in the form of preview in the lower left corner of the screen. Furthermore, by pressing on it, you will be able to go and perform some modifications such as resizing the image, taking advantage of the box around it, or write or draw on the screenshot using the many tools available — pen, highlighter, pencil, eraser, ruler, etc. Once finished, you can then press on the entry end, top left, or tap on Forward arrows e Go back, to restore the image to a previous or later moment or, again, to delete the shot using the icon Delete (shown by a trash can) or share it by pressing on box with arrow pointing up.
In any case, once you've finished editing, you can decide where to save it. Then press the button end and, from the menu that you see opening, select the item Save to Photos, to have it placed in the app in question, the voice Save your File, to save it on iCloud Drive or on iPhone, or press on the entry delete screenshot, but delete it permanently.
If, on the other hand, you don't want to make any changes to the screenshot just taken, ignore the preview or scroll it using a swipe to the left; in this way the shot will be automatically saved in the app Gallery, inside the folder Recent and in the option Screenshot present in the menu Media file types.
How to take long screenshots iPhone 13
If you are browsing with Safari or if you are consulting a document through your iPhone PDF you can make one long screenshoti.e. related to full page. This very useful function to essentially save entire documents was introduced starting from iOS 13 and is very simple to use.
First, once you arrive on the web page or PDF you want to screenshot, proceed with the normal capture using the keys Volume up + right side key. At this point press onpreview located at the bottom left and, on the screen that opens, tap on the tab Full Page, if necessary, make the changes you want by following the same suggestions provided above, and press the button end, then save what you have done by pressing on the item Save PDF to File and decide its position between iCloud Drive e iPhone. In this way, you will have saved your long screenshot and you can find it again using the File app present by default on all iPhones.
Furthermore, if you want to merge one or more screens to manually generate a long one, you can rely on some excellent apps designed specifically for iOS. The first one I want to advise you is Picsow, a free app with the option to purchase theStandard extension at the one-time price of 0,99 € or the Pro version at the price of 1,99 €, which allows among its many functions, to merge the screenshots on the phone.
Its operation is very simple: start the app and press on the item Recent, located at the top, to change location by tapping on the folder Screenshot. Then tap on all the screenshots to merge and choose from the options Vertical o Horizontal. Once done, you can go and make changes related to the display of the screens or, if you have the Standard extension or the Pro subscription, you can press on the tab tools (placed above) and make additional edits such as adding an outline color or a frame, to name a few.
Once the work is finished, to save it, press on theshare icon located at the top right and select one of the options in the menu that opens: with Export Image to Photos, you can save the image in Gallery, with the option Export Image to File you can save it in the app Fillet or, again, you can decide to share it by voice Share Image or to preview it with Preview Image.
Other great apps you can take advantage of to merge screenshots are Tailor, free with watermark (removable at the starting price of 2,99 €) useful for automatically merging screenshots of messages, SMS or WhatsApp, in a single long and continuous screen; or stitch it from functioning more like Picsew, with advertising and limitation of 3 screenshots at a time or the possibility to purchase the Pro version a 2,99 € or again, Stitch Pics which allows you to merge screenshots vertically and for free without particular limitations but with the increase in functions by upgrading to the Pro plan at 2,99 €.
How to screenshot iPhone 13 without button

If, for whatever reason, the first method is uncomfortable for you and you are still looking for How to screenshot iPhone 13, you must know that there is another one which is to use the function AssistiveTouch.
To use it, take your iPhone, tap on the icon Settings and select the item from the list that opens Accessibility. At this point, tap on the items Tocco > AssistiveTouch and move up ON the relative lever of the same name: by doing so on the right side of the screen, you will see a superimposed circle.
Then go to the screen you want to take the screenshot, press the circle and select the icons Device e Other, then tap the option Screenshot to immediately run one.
To further speed up the operation, always acting through the menu Settings > Accessibility > Touch, you can choose to take advantage of the Back touch by tapping on the relevant option. Simply put, by tapping the back of the iPhone two or three times, depending on your preference, you can have it immediately take a screenshot of the screen.
To proceed, once you have reached the screen relating to the Back touch, tap on the item Double tap and select the item from the options on the next screen Screenshot, to set it (you will see a blue check mark). You can also decide to do the same thing with the Triple tap. In any case, whatever mode you decide to use, using these touches will greatly speed up the operation.
How to screenshot iPhone 13 Pro
Possiedi a iPhone 13 Pro and wondering if there are any significant differences from the previously described procedures related to iPhone 13? No, fear not, to take a screenshot on iPhone 13 Pro and iPhone 13 Pro Max the procedures to follow are exactly the same as illustrated above for the "smooth" iPhone 13, so you can refer to the previous paragraphs without any changes whatsoever.
How to screenshot iPhone 13 Mini
Also regarding 13 iPhone Mini the same rules I told you about apply for the iPhone 13 Pro. Among the various iPhone 13 models, but more generally for all models equipped with Face ID, the methods for taking screenshots are the same as in the previous paragraphs of this tutorial.